I authored the e-book Windows Virtual Desktop
Migration Guide for
Remote Desktop Services. This book takes you through a 7-step process of migrating your RDS workloads to WVD.
The book focusses on the migration process and with only 40 pages it's easy to digest!
Recently Parallels announced version 18 of their Remote Application Server (RAS) product is coming soon! The release notes with added features and improvements for this version is huge! The highlights are as:
Windows Virtual Desktop Integration
FSLogix Profile Containers Integration
UX Evaluator & Advanced Session Metrics
Automated Image Optimizations
RDSH & VDI Local Storage Distribution
Management Portal
For an explanation of the full list of this release see this article: Coming Soon in Parallels RAS 18. In this article I want to focus on the Windows Virtual Desktop Integration. I remember conversations with many people of the Parallels RAS team discussing Windows Virtual Desk integration approaches based on their early mock up diagrams. I had the privilege of testing version 18 release during technical preview and it’s great to see the ideas and discussions come to life integration into their product. They did a great job! The parallels RAS product is known for it’s feature richness without the complexity, and they managed to pull that off once again with the WVD Integration!
If you’re familiar with installing Parallels RAS, the installation process of version 18 will look very similar. You do of course have to have a couple of additional requirements in place specifically for the WVD integration. Because of the integration, a couple of permissions on the Azure AD and Azure Resources side need to be in place and Parallels RAS uses an App registration for all of this. I will not cover these steps for now as they will be shared in great detail when version 18 will hit general availability.
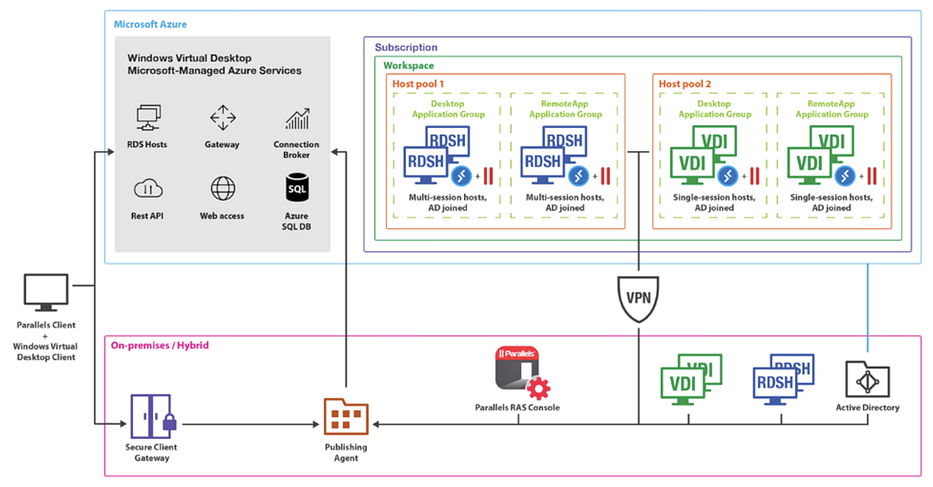
Below is the architecture of the integration with WVD. It shows a hybrid deployment with on premises setup, however RAS can of course also be deployment entirely on Azure as well.
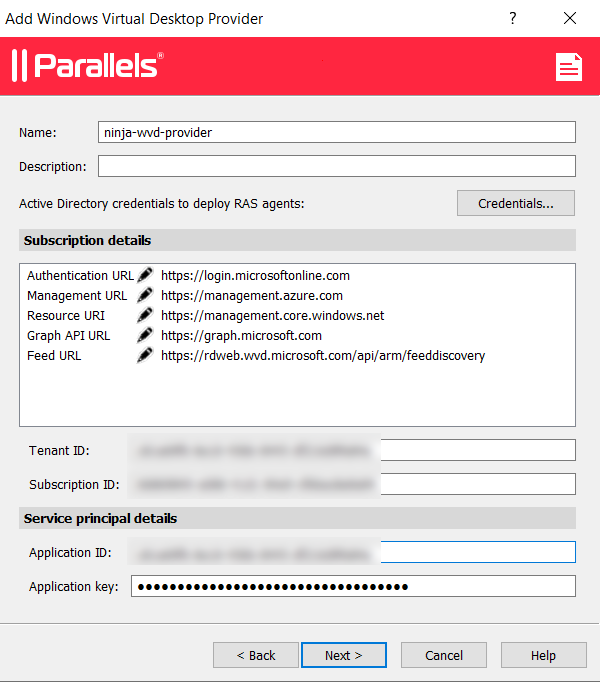
After the installation you will immediately notice the new Wizard in the admin console that guides you through the process of configuring WVD integration.
The first steps is to provide a location where the WVD agent and bootloader will be placed. This is because Parallels RAS will perform the installation of these components for you. Next, you provide the credentials that Parallels RAS will use to communicate with Azure, this result into a Provider object.
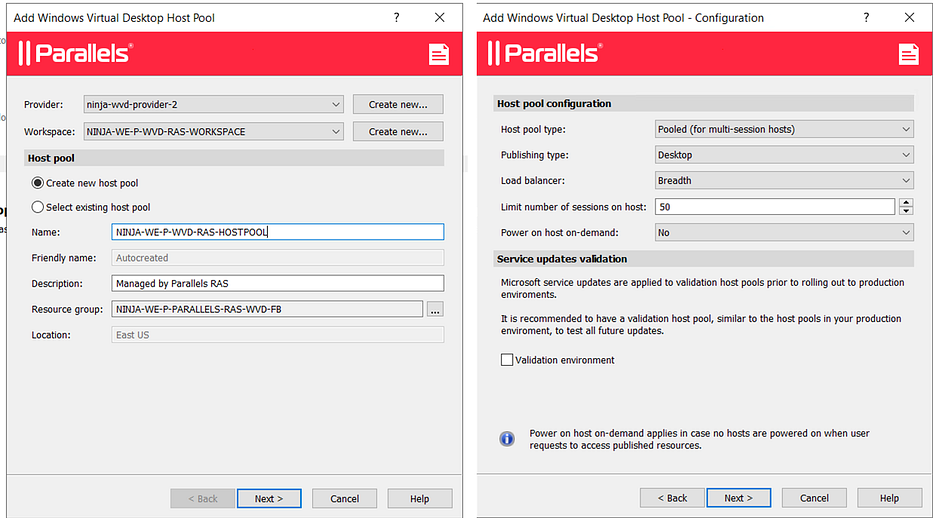
The next step in the wizard is creating the WVD Workspace, you’ll obviously see the same parameters compared to creating the Workspace directly in Azure.
The next step is the creation of the WVD Host pool including the properties like load balancing etc. Notice that Parallels RAS already provides the option to configure a Power On for hosts on demand, which includes pooled configurations! This means the first user to connect to a host pool causes a WVD host to Power On in case all hosts are powered off due to auto scaling.
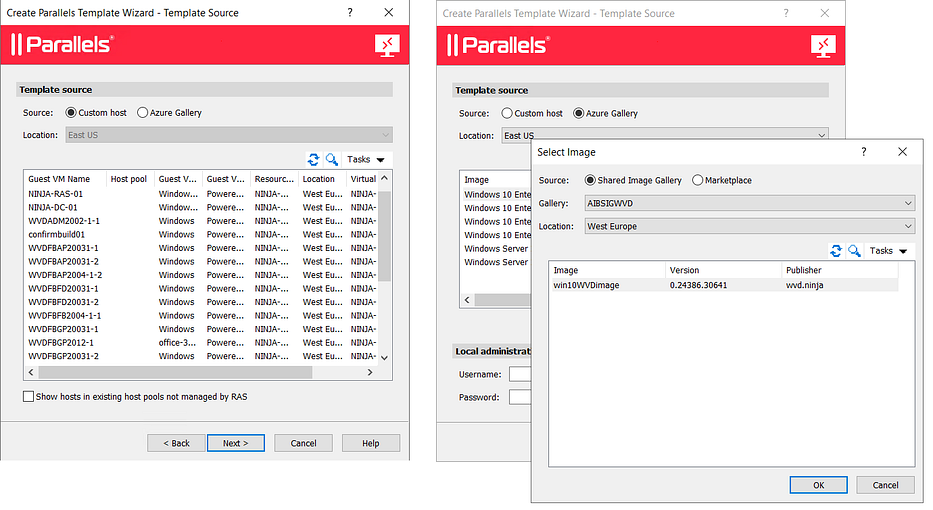
Next we can define the Template to be used for the provisioning of WVD Hosts. We have 2 options here.
Custom Host means we can point to any running VM in Azure that we want to use as a template source. Upon selecting a VM, Parallels will take a snapshot of that VM and use that to provision WVD hosts.
Azure Gallery means we can select any existing Template Image from the Azure Marketplace or our own Shared Image Gallery (SIG).
Note that if you already have existing hosts and do not need autoscaling, then you can also use Standalone (unmanaged) option instead.
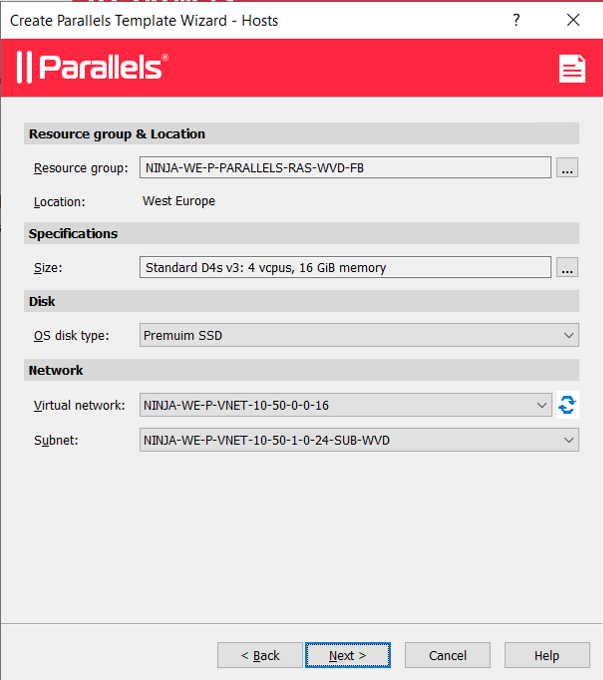
The next step allows us to configure the naming convention for WVD hosts, the number of VM’s, buffers and whether the newly deployed hosts should remain powered on after deployment or turned off for later use.
The next step is to provide sizing, and networking details. The wizard presents easy to use dropdown boxes with information taken directly from your Azure Subscription.
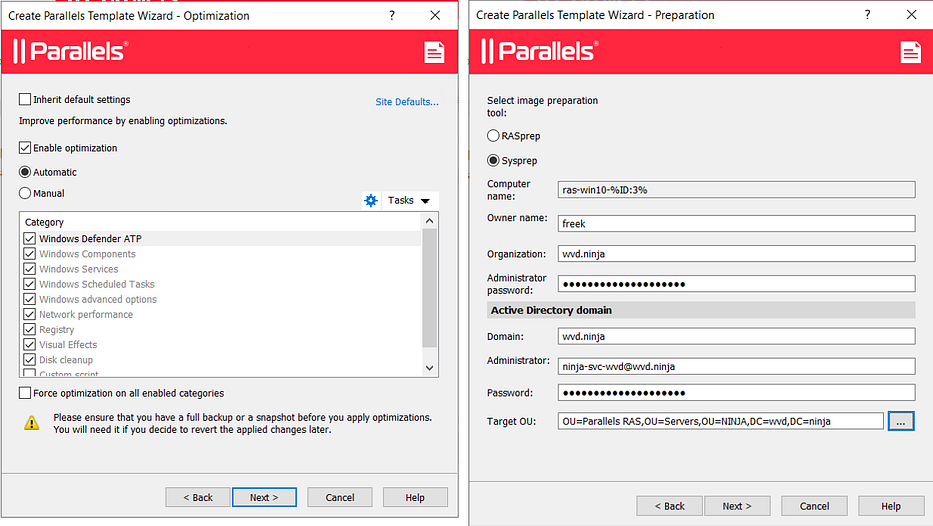
And finally, the wizard allows us to configure image optimization settings that Parallels RAS provides out of he box, which is a great feature. It also allows us to either use Sysprep or Parallels RASprep to prepare the images.
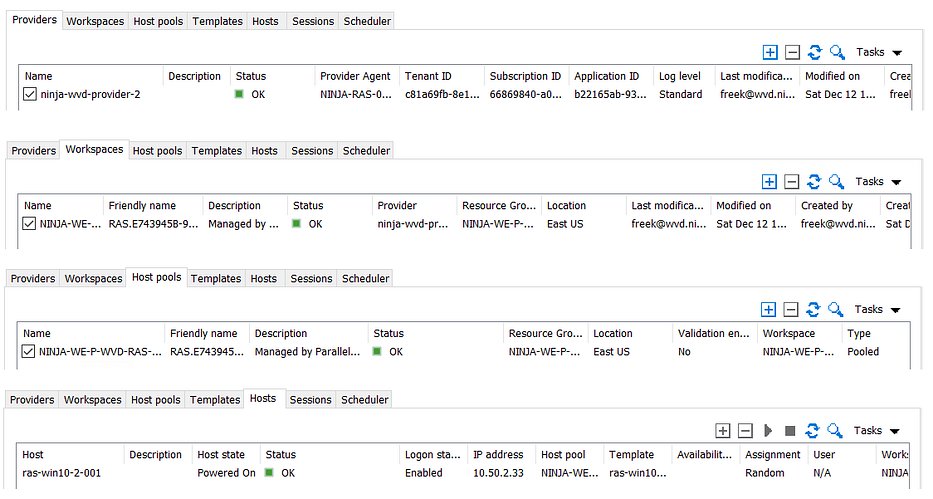
Upon completion, Parallels RAS will create our Workspace, Host pool and App group, prepare the Image in Azure and deploy x number of WVD hosts, join them to the domain and add them to the WVD host pool. Below is a quick summary of what the result looks like in the console.
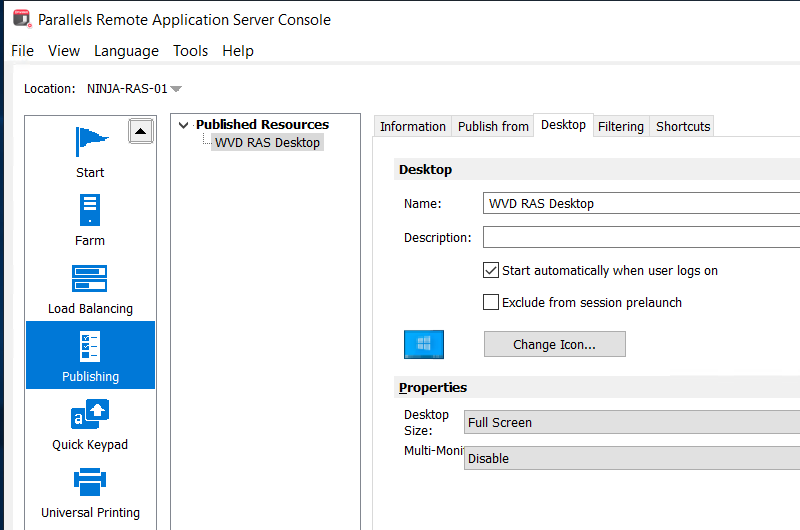
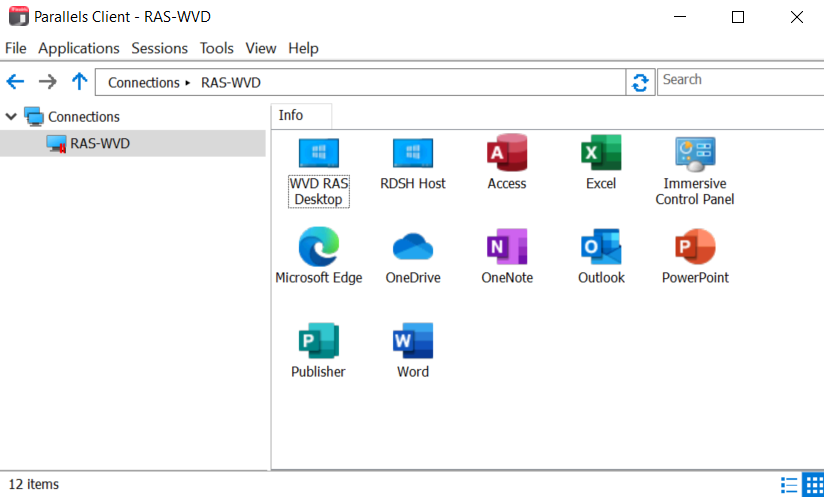
Similar to how we are used to publish applications and desktops in the Parallels console, we can also do this for WVD resources. The great thing is that we can now also mix and match resources from RDS on premises and WVD using a single console and providing these to the user using a single Parallels RAS client, which means Hybrid scenarios!
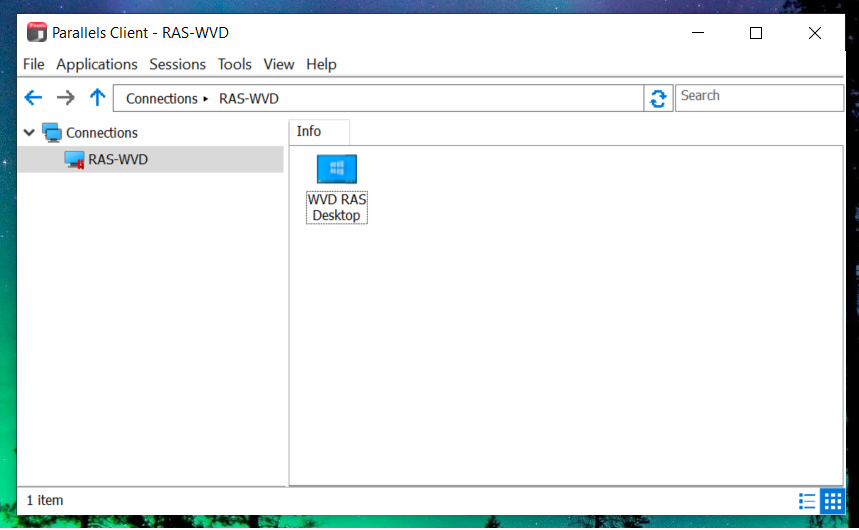
When opening the Parallels Client for Windows and logging on were a presented with the Desktop hosted in WVD.
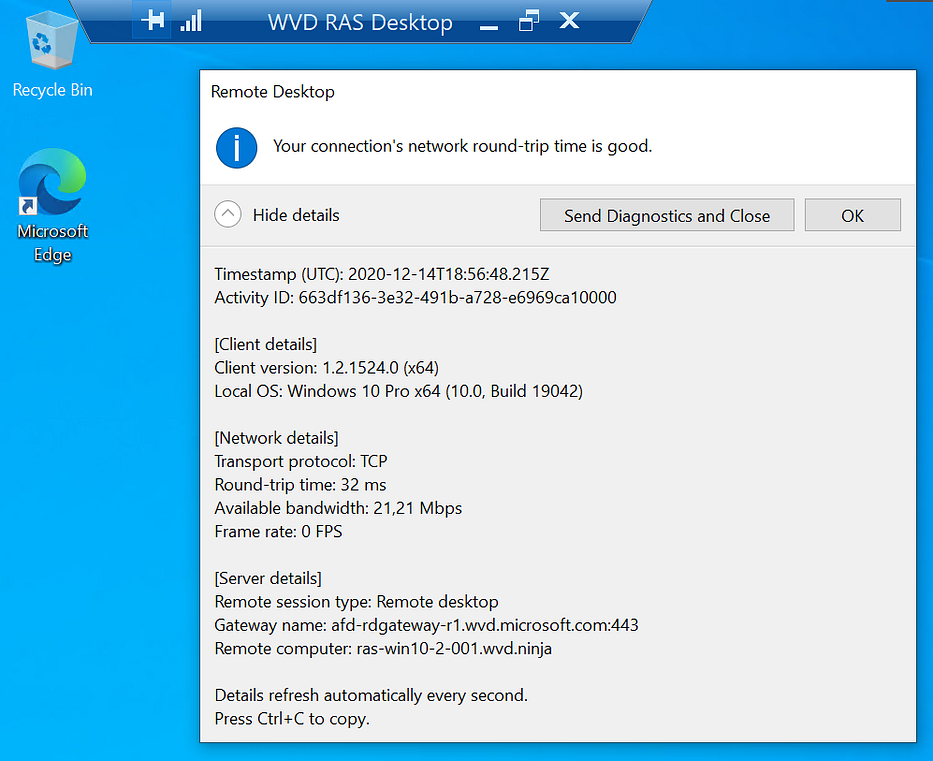
Upon connection we leverage the WVD Client (default option) which means we get all the capabilities of the WVD Windows client.
And this release of Parallels RAS also contains a fully integrated way of configuring FSLogix including all of the advanced settings, very cool!
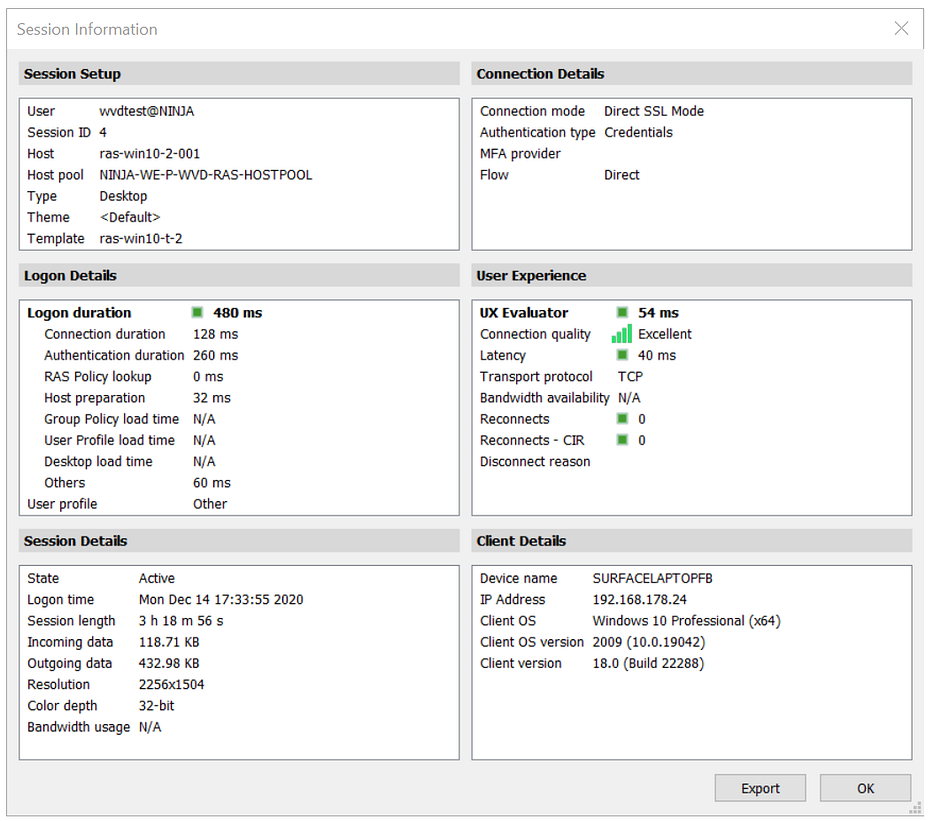
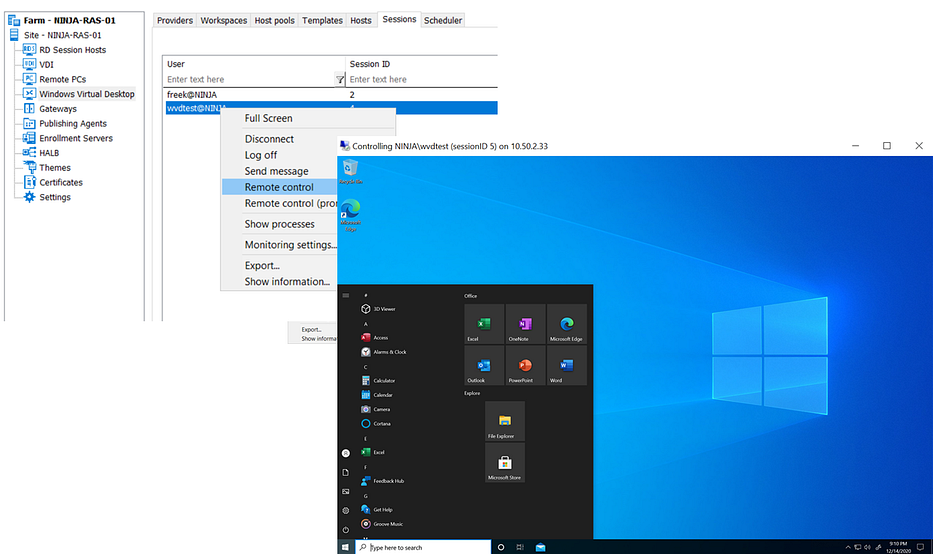
The RAS Console also provides great session details
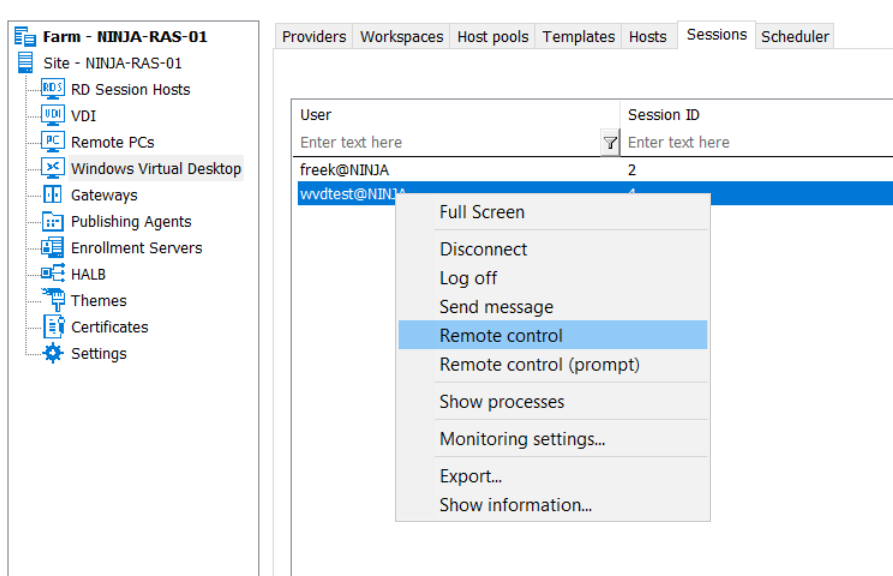
And we can also interact with the session directly, including shadowing.
And finally, below you see a Hybrid scenario with Applications and Desktops coming from an RDSH farm as well as a Desktop coming from WVD, all in a single client with a single identity!
This article focussed on the WVD integration of release of Parallels RAS, the team once again did an amazing job! As said before, they provide great additional features on top of native VWD without the penalty of over complexing things. Special thanks to Christian Aquilina, Director of Program Management at Parallels for providing me tech preview access and reviewing this article. Stay tuned for Parallels RAS 18 to become Generally available and try it out for your self!
I had the privilege to test drive the integration of MSIX app attach in the Azure portal at an early stage. In this article I’ll share my early test results!
Before we get started we obviously needs MSIX app attach packages ready on a share and accessible from the Host Severs. This process is identical to way we performed that when using the PowerShell method of staging and registering, so I won’t repeat that here. Instead, let’s jump right in and take a look at the integration in the Azure Portal! Inside the Azure portal on the Host Pool blade, we now have a new option MSIX packages.
This allows us to perform the first step, staging applications to all WVD Hosts that are part of this host pool. By clicking Add we can specify the UNC path towards the MSIX app attach package (IaaS File Share, Azure Files et cetera). And after doing that the list of MSIX applications (entry points) inside that package is retrieved and presented in a dropdown box. In the example below I have seven applications inside a single package. For this step to work, the host pool obviously needs to be in a healthy state, and at least 1 WVD Host needs to be running. Adding MSIX packages to a host pool will trigger the RD Agent on a healthy WVD Host inside the pool which is randomly selected. That WVD host will then load, parse, and validate the MSIX image and the MSIX packages stored inside it.
After selecting an application we are able to complete the application details by providing the application name, display name description etc.
After completing this for a couple of example applications this looks like below.
At a five minute interval the RD Agent on each WVD Host that is part of the host pool will contact the WVD management service to check for any updates. During that time the Staging step takes place and the WVD Host will mount the MSIX app attach package. This can be confirmed by taking a look at disk manager.
In order to prevent users from using the MSIX package before it is staged on all WVD Hosts, you can set to the state “Inactive” in the Azure Portal.
Now that we have covered the staging step, let’s take a look at the registering step. For that we open the WVD App group we want to use and select Add. This allows us to specify the MSIX source package and select an application.
After completing the step for in this case 4 sample applications, that looks like below.
We can now log on with a test user who is a assigned to this application group and see the end result. Upon logon, the registering step takes place and the MSIX app attach application now appear in the session!
And here are all four applications running in my user session coming from, in this case, a single MSIX app attach container!
We covered working with MSIX app attach in the Azure Portal, but the PowerShell equivalents are of course also available to help automate the configuration. For that to work, make sure you update your Az.DesktopVirtualization to version 2.0.1. Below is an example of using Get-AzWvdMsixPackage.
In case you want to change the 5-minute interval that WVD hosts use to check for MSIX app attach updates, here is the corresponding registry location.
The Event log also provides information about the various staging and registering steps.
Below is a nice visual representation of the MSIX staging and registering steps, as shared by Tom Hickling.
And finally, special thanks to Stefan Georgiev for providing the preview information and the ability to test drive this early! It’s super great to see huge steps MSIX app attach is taking. The integration in the Azure Portal works really well! Looking forward to adding more applications and test-driving other scenarios!