
So, Windows Virtual Desktop (WVD) Spring Update (Public Preview) is out as of last week! In case you missed it, on the day of the launch I published an article covering my experiences of testing WVD Spring Update in private preview! I talked about the top 10 things that stand out. Catch the article here: The next big innovation in Windows Virtual Desktop is here!
As discussed in the article mentioned above, WVD Spring Update makes deploying and managing Windows Virtual Desktop a lot easier because there now is full integration in the Azure (Resource Manager) Portal! Since the first release of WVD saw the light on September 30 of last year, many organizations have already deployed it and have it running in production. I myself have helped at least a dozen of organizations with architecting and implementing and many of them are using it in production right now. So, the question arises, how can we start to manage existing WVD Workloads with the new WVD Spring Update Azure Portal Integration?
First of all; Microsoft is also working on a set of PowerShell Cmdlets for the Az PowerShell module that can be used to migrate an existing Host pool including hosts from WVD Fall 2019 to WVD Spring 2020 update. I have already seen private preview information on this and it looks very promising! If the Cmdlets become available in public preview I will share it here. In the mean time, this article explains how to migrate your workloads today! Also, it is a good exercise to perform migrations using the steps explained in this article as it allows you to get familiar with the new components, PowerShell Cmdlets, ARM code and so on.
This article talks about migrating your existing WVD Workloads to WVD Spring Update!
Before we start it’s important to realize what WVD Spring Update exactly is. It is not “just” a new Management Console for WVD. It all about making WVD a 1st Party application in Azure and as a result some changes to the WVD Service were needed. Below is a quick summary of the most important changes. Again, for a full list and more detailed information, check my previous article referenced in the first paragraph.
- WVD Backplane components are now ARM Based and manageable and visible in your Azure Portal.
- RBAC for WVD is now based on the Azure RABC model
- PowerShell Cmdlets are now integrated in AZ PowerShell
- The hierarchy of the WVD Backplane components changed
To answer the most important question; Can existing WVD Deployments and resources be instantly managed using the new Spring Update Azure Portal integration? The short answer is no. Does that mean we need to start entirely from scratch? No again! It comes down to migrating your WVD Host Servers from WVD current release to WVD Update Release. This article takes you through these steps.
Migrating to Spring Update (even with the upcoming migration Cmdlets) basically comes down to 4 main steps:
STEP 1 — Duplicating existing WVD backplane configuration into WVD Spring Update In this step we are going to duplicate existing WVD Tenants, Host Pools and Applications Group into the WVD Spring Update. Basically, we are creating a second WVD Deployment fully separated from the existing WVD Deployment. Depending on the size of your existing WVD Deployment you can perform this manually using the WVD blades in the Azure Portal, by using JSON Templates, or by using PowerShell to export and import the configuration. In this article we will use PowerShell to automate the duplication of a Tenant with a Host pool and AppGroup. And we’ll also briefly touch on JSON and VD blades in the Azure Portal.
STEP 2 — Moving your existing WVD Hosts to WVD Spring Update In this step we are moving WVD Hosts from the existing WVD Host pool towards the new Host pool in WVD Spring Update. This step can be performed with a single WVD Host at first to start testing the WVD Spring Update Update, and later additional WVD Hosts can be migrated the same way. We’ll also discuss the option to recreate a new set of WVD Hosts in parallel with the existing environment.
STEP 3 — Assign users and groups In this third step we will assign permissions to the WVD Host pool to allow (a subset of) users to be able to test the new deployment.
STEP 4 — Testing the migrated WVD Deployment We are now ready to test the migrated WVD workload using our WVD Clients and plan for next steps.

So let’s go ahead and dive into the migration deep dive, here we go!
STEP 1 — Duplicating your existing WVD backplane configuration into WVD Spring Update
This first step is all about exporting your WVD Configuration on the current release so that you can import that configuration in WVD Spring Update. For this example, I selected an existing WVD Host pool that publishes a Full Desktop. But obviously, the same steps apply to migrating a Host pool that publishes a set or RemoteApps. In that case however, make sure to add the additional Cmdlets to export published RemoteApps. In this example I chose to duplicate a single Host Pool in each run to get better control over the migration path, the script can of course be extended to run in a loop to export every Host Pool.
First, we need to define the parameters based on our existing environment, so the Tenantname, HostpoolName and AppGroupName. And second, we define the SubcriptionID, destination ResourceGroup and Location of our new WVD Spring Edition deployment. Remember that these 3 properties are mandatory as outlined in my previous article.
Next, we logon to the existing WVD Deployment.
Next, we export the properties of the VWD Tenant (remember that starting from WVD Spring Update this is renamed to Workspace), Host Pool and AppGroups. In this example I made a selection of properties I am interested in but you might need to expand these for specific scenarios were other properties are of interest as well.
Now, let’s connect to Azure using PowerShell and import the new WVD module, which is now part of Az PowerShell.
Now we can create the WVD Workspace based on the exported values of the existing WVD Tenant and we add a postfix “-Migrated” to it in order to differentiate the existing and new published desktops inside the WVD Client. This is of course optional.
After the WVD Workspace has been created, we perform a similar approach to create the (empty at first) WVD Host pool based on parameters we exported earlier.
And finally, we create the App Group in a similar way, also based on the values we exported from the existing environment.
New in WVD Spring Update is that an App Group needs to be associated to a Workspace in order for end users see assigned applications and desktops. The command below creates this association for the App Group and Workspace we created above.
And as a final step we configure the Friendly Name of the Published Desktop, duplicating how it was configured in the existing WVD Deployment.
This concludes Step 1; we have now duplicated the WVD Backplane components to WVD Spring Update! The end result in the Resource Group looks like below. A Workspace, Host pool and App Group have been created.
The workspace has an association with the App Group.
And all other properties are successfully migrated as well, as per example below some of the properties of the Host pool we migrated.
In this example we used Az PowerShell to create the WVD Spring Update backplane components. Since Spring Update is fully based on ARM, we could have also created these objects using JSON templates. Below is an example of what it would look like to create a Workspace, Host pool and Appgroup using JSON.
STEP 2 — Adding your existing WVD Hosts to WVD Spring Update
Now that we have the backplane components in place we have a Workplace, Host pool and App Group ready. It’s now time to add (existing) WVD Host Server towards this new host pool. Before we start, the goal of this step is to add WVD Host(s) to the Host Pool we created in step 1 and there are 2 migration options for this scenario. Select the one that is applicable for your environment.
Option 1. Using Existing (custom) template VM images
If you have an existing WVD environment based on current release you deployed your WVD Host based on a (custom) template and most likely (and hopefully) still have access to that template. In case you used a vanilla Windows 10 Enterprise Multi-Session template, you can simply re-use that same template to add new WVD Hosts Servers to the new Host Pool. But most likely you used a Custom Image Containing company specific applications, in that case you need to have access to the Template Image that you used when deploying the existing Host pool, for example Template Image objects like below.
In both cases (vanilla- or custom template image) the steps to add WVD Hosts is similar approach.
You first generate a Registration Key for the Host pool. With WVD Spring Update this can now be performed easily from the Azure Portal (and also still using PowerShell) as shown below.
Then we are able to add new WVD Host to the host pool by using the Azure Portal WVD Management blades.
Next, you specify the WVD Host properties like the Region, Size, Number of machines and Prefix similar to how you deploy WVD today.
Then you specify the image in case you used a vanilla image, select Gallery and select the image you used. In case you used a custom template image, select Storage Blob and configure the location.
And finally, provide the networking information, the domain to join including the service account to add the machines to the Active Directory domain.
The end result is that the WVD Host Pool now has WVD Hosts added to it.
We performed the actions as part of Option 2 manually using the Azure Portal. You can of course also use Custom ARM Templates if you want to have granular control over what gets created. In a previous article I talked about my Custom ARM Template for WVD Current release. In the mean time I have already updated that Custom ARM Template to also support WVD Spring Update, I’m planning to talk about that in more detail in an upcoming article, but to give you an idea of what it looks like, I added a screenshot of the deployment using that Custom ARM Template.
Amongst other options it allows for fast and easy selection of Workspaces and Host pools from dropdown lists with preconfigured values.
Option 2. Migrating existing WVD Host(s)
In case your current WVD Deployment was build on a Custom Template Image that for some reason is not available anymore, out of date, or if you never used a Template before and installed applications in a different way, you can also move & migrate the existing WVD Hosts.
For this option 2, let’s consider the following example. I have an existing WVD Host pool based on current release. This Host pool consists of 2 WVD Host servers, based on Windows 10 Enterprise Multi-session.
We use the command below to retrieve the WVD Hosts that are part of the existing Host Pool.
The output looks like below.
For this example, lets migrate the 2nd server (WVDFBFD20031–2.wvd.ninja) and leave the 1st server in place to support existing sessions. Again, this is a sample environment, in production environments you will have more hosts to migrate. The command to remove the WVD Host is as shown below. Optionally you can use the -Force option if the host has existing sessions that can be ignored.
We log on to the WVD Host server and open the Installed Programs section. Amongst other installed software, we can see the components that are needed for WVD. Depending on how long this WVD host has been running you will see multiple previous version of the agent and SxS stack as well.
The safest way to migrate this WVD Host to the new WVD Spring Update host pool is by first uninstalling all of the WVD Agent & SxS versions. It can be done manually, but I have created a PowerShell script that uninstalls the various agents including multiple previous versions if those exist. Be careful where you run this script and use it at your own risk as it does not ask for confirms and uninstalls instantly.

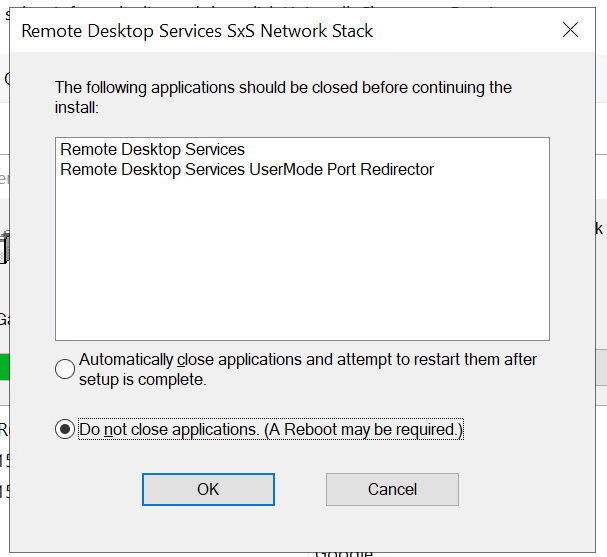 An automated uninstall step of the SxS Network stack seems to temporarily drop your RDP session, so I left that out. If needed it can be uninstalled manually. select “do not close “to avoid the drop in your RDP session. I have not found the uninstall switch to force to this mode yet.
Then we add the WVD host to the new WVD Spring Update Host pool. In order to do so we log in to Az PowerShell, in this case with our ServicePrincipal account.
And finally, we download and install both the WVD Agent passing it the registration token and we download and install WVD Boot Loader
The end result in the Host pool looks like below, the host is successfully migrated from WVD Current version to WVD Spring Update!
The script snippets I shared above as part Option 2 are actually part of a fully automated PowerShell JSON Extension Script that I use to deploy WVD Hosts to a new host pool or expand a Host pool with additional WVD Hosts.
STEP 3 — Assign users and groups
Now that we have the WVD Backplane components including freshly installed or migrated WVD Hosts, it is time to start assigning permissions to the created App Group.
With the current release of WVD, the way you provide access to a Published Desktop or (set of) published applications is by assigning an Azure AD user to a WVD App Group. This means you must add each individual AD User to a WVD AppGroup. If you have a handful of users and only a few App Groups that is not really an issue. It becomes a challenge however when you have hundreds or thousands of users and dozens of App Groups. In that case adding AD Users to an App Group cannot be performed manually anymore. Scripts or Azure Jobs that sync AD or AAD members towards App Groups as shown below become mandatory.
With WVD Spring Update we can now directly add Azure AD Groups to WVD App Groups! This makes management of WVD a lot easier and was a big requested feature! To add an AAD Group to a WVD Spring Update App Group, browse to the App Group, select Assignments and as you can see below, I am able to add AAD Groups as well as ADD Users.
So, when it comes to migrating user access from WVD Current Release to WVD Spring Update, in most cases it will be a matter of creating new AAD Groups and adding those to App Groups.
In case you want to add users and groups using PowerShell, you can use the Azure RBAC model, and so *-azRoleAssignment can be used. For example, here is the code to add an individual user.
And below is the code to add a Group. Since this specific group is a security group it does not have a SignInName, so I am adding it based on its ObjectID.
And similar, I can retrieve the users who have access to the AppGroup as shown below.
The end result looks like below, in this case both an individual user as well as an AAD Group are added to the WVD App Group.
STEP 4 — Testing the migrated WVD Deployment
So, finally we can now test the migrated workload. In order to see resources published from a WVD Spring Update deployment, the version of the WVD Client needs to be version 1.2.673+.
After that you can use the same WVD Client to access both WVD Current version as well as WVD Spring Update resources. Again, working with these published Apps and Desktops from the end users perspective has not changed.
After that you can use the same WVD Client to access both WVD Current version as well as WVD Spring Update resources. Again, working with these published Apps and Desktops from the end users perspective has not changed.
Below is the WVD Windows Client that now shows both the existing WVD workload (1) and the new WVD workload based (2) on Spring Update!
And when we launch the Full Desktop published in WVD Spring Update we can confirm it is successfully working!
And as a last step, lets confirm the running session in the Azure Portal.
This wraps up & concludes this migration article. After testing the Spring Update thoroughly, you can plan to start adding or moving more WVD Host Server and expand the group of users to migrate in several phases.
And finally, as also stated in the beginning of the article;
Microsoft is also working on a PowerShell Cmdlet for the Az PowerShell module that is able to migrate an existing Host pool and hosts from WVD Fall 2019 to WVD Spring 2020 update. If it becomes available in public preview I will share it here. Nevertheless if a good exercise to perform migrations using the steps explained in this article as it allows you to get familiar with the new components, PowerShell Cmdlets and ARM code.
Also, a shout out to Marcel Meurer who updated his WVD Management tool which also allows you to migrate host pools, great work!
And as always, if you have questions feel free to reach out to me via e-mail, twitter or Linked-In!
originally posted here: https://www.linkedin.com/pulse/migrating-your-existing-wvd-workloads-spring-update-freek-berson/
No comments:
Post a Comment