
Preface
If you have been following this blog you will have noticed the series on using Azure Resource Manager to perform an automated deployment of Remote Desktop Services in Azure IaaS. If not, here are links to the previous eight articles to get you up to speed: article1, article2, article3, article4, article5, article6, article7, article8.
Introduction
 This article continues the story, but this time it’s different. In my continuous mission on improving the JSON script and sharing my journey here, I decided to take the JSON script to another level and push it to deploy a 100 RDSH Server deployment in Azure IaaS. And so I did. Along the way, I sacrificed 140 EUR worth of MSDN Azure Credits to accomplish this, but it was worth the fun! In this article I would like to share the outcome and also share the issues and limitations I ran into.
Getting started
If you have been reading my other articles in this series, you’ll remember that part the JSON script I discussed in there touches on the ‘Copy’ parameter and corresponding ‘CopyIndex()’ function. This is key to deploying multiple Azure Resources of the same type in a fast way. To reiterate on that, the Copy parameter in an Azure Resource is used to specify that you want ARM to deploy an Azure Resource multiple times. As per example below, we use the Copy parameter to deploy an RDSH server in Azure IaaS multiple times by specifying a value in the parameter numberOfRdshInstances.
"copy": {
"name": "[concat(parameters('RDSHHostNamePrefix'),'vm-loop')]",
"count": "[parameters('numberOfRdshInstances')]"
},
And throughout the rest of the declaration of the Azure Resource, we can use the function ‘CopyIndex()’ to refer to the specific created resource. To provide a few example of that, below we use the ‘CopyIndex()’ function to create a unique name for the Virtual Machine.
"name": "[concat(parameters('RDSHHostNamePrefix'),'0',
copyindex(1))]",
And to create a matching Hostname Virtual Machine.
"computerName": "[concat(parameters('RDSHHostNamePrefix'),'0',
copyindex(1))]",
And also to create a matching reference in the depends on section, pointing to the connected Virtual Network Adapter.
"[concat('Microsoft.Network/networkInterfaces/',
parameters('RDSHHostNamePrefix'),'0', copyindex(1),
parameters('NetworkAdapterNamePostFix'))]"
Based on the information above the first step would be to provide the parameter 'numberOfRdshInstances' with the desired number. In this case I performed this by simply modifying the corresponding this parameter in the azuredeploy.parameters.json file to 100.

If we would then kick of this deployment in an average Azure Subscription, it will most likely fail. In most cases the error would be something similar to below.
Operation results in exceeding quota limits of Core. Maximum allowed: 40, Current in use: 5, additional requested 208This is because Azure sets limitations to various resources to prevent you from accidentially deploying resources you did not intend to, leading to what they call a ‘billshock’.
The additionally requested number of 208 cores is the sum of:
- 2 RD Connection Broker Servers of type Standard_D2 (2 Cores)
- 2 RD Gateway / Web Access Servers Standard_D2 (2 Cores)
- 100 RD Session Host Servers Standard_D2 (2 Cores)
The steps to work arround this limitation are easy. Log on to the Azure Portal, and click on ‘New support request’

Follow the steps and create a new support request to raise the Core limit. In this case I chose the safe side and created a request to raise the limit to 250 cores.

In most cases the limit will be raised within 24 hours, and you’ll receive a notification from Microsoft Support to confirm this as shown below.

Now that we have 250 cores available for D-series VM’s we can kick off the deployment. On a side note, keep in mind that the subnet you select to use has enough free DHCP IP addresses. Or, in case you’re using fixed IP adresses like I do in my script, make sure you use a starting IP that results in enough space to host 100 IP addresses. The way I approached this is by starting with .60 as last octet of the IP address of the first RDSH NIC and then using the CopyIndex() function to create unique IP addresses ending with .61, .62 et cetera. The code below shows how this works.
"ipConfigurations": [
{
"name": "[parameters('NetworkAdapterIPConfigName')]",
"properties": {
"privateIPAllocationMethod": "[parameters('NetworkAdapterIPAllocationMethod')]",
"PrivateIpAddress": "[concat(parameters('InternalIPAddressPrefix/24'),`
copyindex(60))]",
"subnet": {
"id": "[variables('subnet-id')]"
}
}
}
]
Kicking off the deployment
At this stage we’re ready to kick the tires of this deployment for the first time. Running a 100+ Server deployment from ARM is a phenomenal sight. Literally within seconds of the launch of the deployment hundreds or resources are being created in Azure. Below is what the first few seconds looked like from the Visual Studio output.

Within a minute, 100 Virtual Network Adapters were created and Virtual Machines were
pinning up.

And soon after the Virtual Machines were created, each would run their own Custom Extension to add itself to the existing Active Directory Domain. In the screenshot below, 81 RDSH Server have already been added.

So far so good. A limitation I then ran into however, was inside the process of creating the RDS deployment itself. If you remember from previous articles, we use a Custom Script Extension that launches a PowerShell script on the RD Connection Broker server. This script is, amongst other things, responsible for creating the initial RDS deployment and adding the RDSH Servers to that deployment. Below is the sniped of that PowerShell script where the RDS deployment is created.
#Create the basic RDS
Deployment
$scriptreateBasicDeployment =
{
param($ConnectionBroker1, $Gateway1, $SessionHost1)
import-module RemoteDesktop
New-RDSessionDeployment -ConnectionBroker $ConnectionBroker1
-WebAccessServer $Gateway1
-SessionHost $SessionHosts
}
The CmdLet New-RDSessionDeployment accepts a parameter called ‘SessionHost’. This parameter allows you to specify a single RD Session Host server or, as in my example, an array of multiple RD Session Host servers. In this case, the script constructed an array consisting of 100 RD Session Host servers. It is at this point where I ran into a limitation. The New-RDSessionDeployment did not like the fact that I passed an array of 100 servers. The CmdLet seemed to hang and did not output anything. I left it running for about an hour and then decided to cancel the deployment and redesign this part of the script.
I now tried a different approach. Instead of passing an array of 100 servers in the New-RDSessionDeployment, I passed the first RDSH server only. Followed by that statement I used a for..each loop holding the Add-RDServer Cmdlet that can be used to add a single RDSH Server to an existing deployment.
Add-RDServer -Server
$SessionHost -Role
RDS-RD-SERVER -ConnectionBroker
$ConnectionBroker
And although this approach worked, the process was very slow. On average, the Add-RDServer Cmdlet seemed to take ~2 minutes which would result in >200 minutes to complete this process.
I now took the Add-RDServer out of the script again, and instead of running that command sequential for each RD Session Host from the RD Connection Broker Custom Extension, I created a Custom Extension for the RD Session Host servers. The result is that each RD Session Host server would then add itself to the existing deployment and Session Collection, a far more effective approach.
Upon rerunning the deployment again (while also watching the Azure Credits go down fast) this approach seemed to be working really well! RD Session Host servers started adding themselves relatively quickly. This time it completed successfully!
Below is a screenshot of the deployment in process where each RDSH Server runs its own Custom Extension.

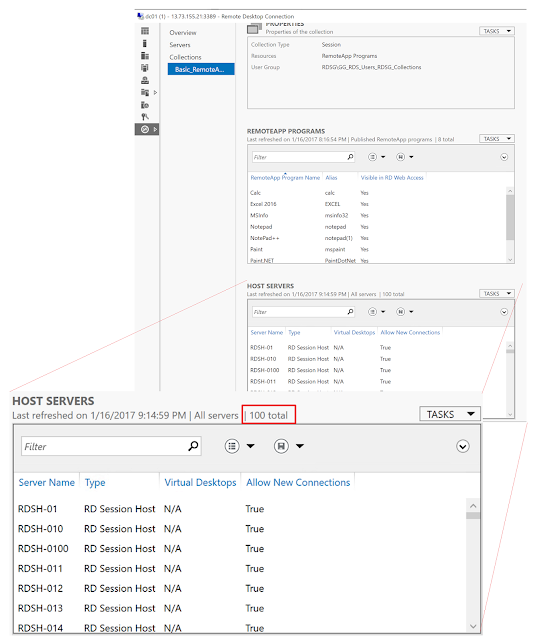
The end result is an RDS Deployment consisting of 108 RDS server roles
With 100 RDSH Servers into a single Session Collection.
I now took the Add-RDServer out of the script again, and instead of running that command sequential for each RD Session Host from the RD Connection Broker Custom Extension, I created a Custom Extension for the RD Session Host servers. The result is that each RD Session Host server would then add itself to the existing deployment and Session Collection, a far more effective approach.
Upon rerunning the deployment again (while also watching the Azure Credits go down fast) this approach seemed to be working really well! RD Session Host servers started adding themselves relatively quickly. This time it completed successfully!
Below is a screenshot of the deployment in process where each RDSH Server runs its own Custom Extension.

The end result is an RDS Deployment consisting of 108 RDS server roles

With 100 RDSH Servers into a single Session Collection.
This concludes the journey. The end conclusion is that yes you can create a 100 RDSH server automated RDS deployment using JSON and ARM. Although it’s most likely not a very common scenario, it was interesting to see what challenges and limitation we would face deploying that many servers in an automated way and a fun exercise. Being able to provision this many servers in such a short period of time really is one of the many powers behind Microsoft Azure. It truly is a very powerful and flexible Cloud platform.


