Tuesday, July 14, 2015

RDS Deployment template available in Azure Resource Manager!

The RDS team did a great blog post on using the RDS Deployment template for Azure Resource Manager. Azure Resource Manager enables you to work with the resources joined as a group and allows you to deploy, update or delete all of the resources for your purpose in a single, coordinated operation. Using a Azure Resource Manager Template you can very easily setup a environment (in this case RDS) and deploy that as a group of resources. Azure Resource Manager is the Management API layer for the future Microsoft Cloud!

I took the RDS template for a test-drive, the result was pretty impressive. A full RDS deployment up & running!

This is what the template creates for you:

  • VNET
  • New storage account
  • Public IP resource
  • Load Balancer resource, including the correct ports opened 
  • VM for Active Directory and DNS server roles
  • VM for RD Gateway and RD Web Access server roles
  • VM for RD Connection Broker and RDS License server roles
  • VMs for RD Session Host (RDSH) servers.
  • A Basic ADDS deployment
  • A RDS Full Desktop Deployment, incl. RD Gateway, Licensing etc.

image

After the Azure Resource Manager template deployment finishes, you end up with a working RDS deployment, accessible from the outside, ready to do testing for a POC, testing customizations etc.

image

The only thing not configured is obviously SSL certificates. Which means you will end up with a self signed certificate. This can however be changes easily by providing the SSL certificate in the RDMS on the RD Connection Broker server.

Obviously this is not production ready, but what’s also cool about Azure Resource Manager Templates in general is that you can create your customized template, for example basing it on the one for RDS that’s being provided and start building your own template.

image

To open the template directly from you subscription click the icon below.

image

More information on the RDS template here: http://azure.microsoft.com/en-us/documentation/templates/rds-deployment/ 

Link to the RDS Team blog article: http://blogs.msdn.com/b/rds/archive/2015/07/13/azure-resource-manager-template-for-rds-deployment.aspx?utm_source=dlvr.it&utm_medium=linkedin

More overall information on Azure Resource manager:
https://azure.microsoft.com/nl-nl/documentation/articles/resource-group-overview/

Thursday, July 9, 2015

Adding Conditional Access & MFA to Azure RemoteApp

(Originally posted on rdgurus.com)

Because the Azure RemoteApp client authenticates against Azure Active Directory (AAD) we are also able to leverage Conditional Access and Multi Factor Authentication (MFA) based on AAD. The RDS Product team also recently announced this in the blog post Control access to Azure RemoteApp with Azure AD Conditional Access!

In this blog post I’ll guide you through the process of setting up MFA on Azure RemoteApp.

First of all, Conditional access requires Azure AD Premium (currently in preview). You can however set this up in a 30 day trial. To do that, open the Azure Portal browse to your AAD and choose the option “TRY AZURE ACTIVE DIRECTORY PREMIUM NOW”

image

Confirm the agreement belowimage

It take a few minutes to setup. Click the refresh link to be able to start using it.

image

Shortly followed by that, you should receive a confirmation email that the organization is ready for Azure AD Premium.

image

To configure MFA, reopen the Azure Portal, go to Active Directory open your AAD domain en choose Applications.

image

Now click on Microsoft Azure RemoteApp and go to the Configure tab. For this demo, we’ll select Enabled Access Rules, have it applied to all users, and select Require multi-factor authentication.

image

The next time we log on to the Azure RemoteApp client with an organization account from this AAD, we are presented with the following;

image

This is MFA kicking in. We click “Set it up now”. And without having to leave the Azure RemoteApp client, we’re being presented the ability to provide a phone number and verification type that we would like to use for this account. In this case I choose Phone Authentication, and provide my cell number. (we obviously only have to perform these steps once).

image

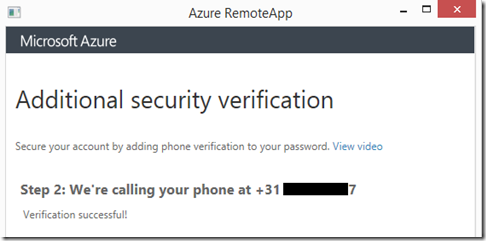
When we click Contact me, Azure MFA will call me on the number provided to verify the correct number.

image

The verification process is now completed and we are ready to use MFA for Azure RemoteApp.

image

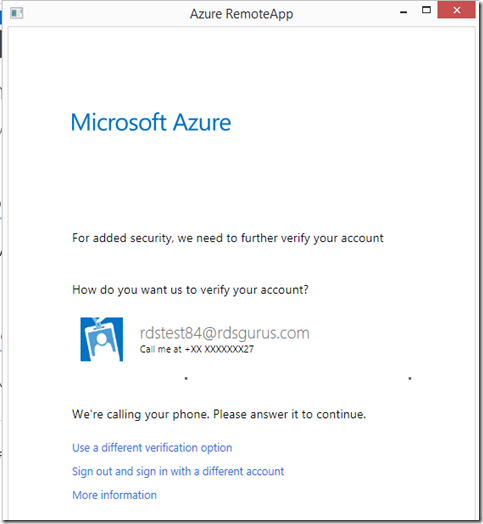
When proceeding the logon in the Azure RemoteApp client we’re presented with the following screen indicating that we can expect a call to our provided phone number to perform the MFA !

image

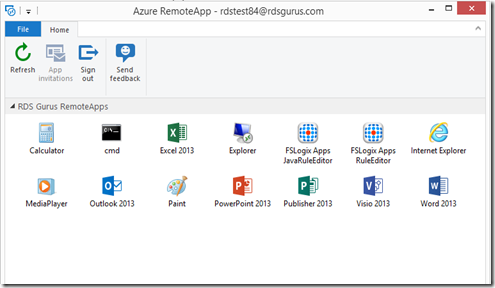
And after that, we’re presented with the RemoteApps assigned to us based on the Azure RemoteApp Collection.

image

There are some other options in conditional Access policy worth mentioning. We can for example specify to only enforce MFA when people are connecting from outside of the corporate (trusted) locations, or even block access in those cases.

image

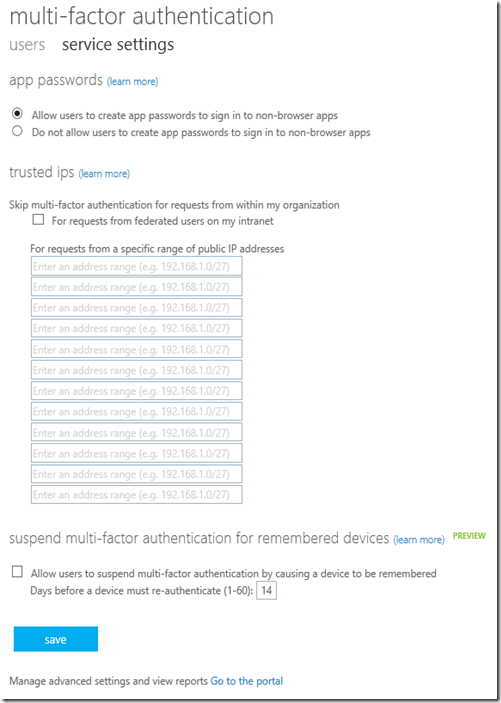
By clicking the link, we’re able to configure these trusted locations, configure whether or not we want to allow app passwords and even allow users to suspend multi factor authentication from remembered devices.

image

This blog post was originally posted here:
http://www.rdsgurus.com/azure-multi-factor-authentication/adding-conditional-access-mfa-to-azure-remoteapp/